Tuesday, December 28, 2010

Never Posted.....Have A Happy New Year!


 Just A Few I never got around to posting....
This top card was our Family Christmas Card 
everyone in the Family either cut, glued, stamped, or did something for this card!
I thought it turned out GREAT!
Enjoy!
Have a Safe and Happy New Year!
See Ya Next Year!
Hugs and Loves
Sam


Monday, December 20, 2010

My Gift to You...From A Latte Stampin

A New Template... Hobby Horse Candy Cover.
I have several Samples of these made just have not had the time to take a picture
Use all Year Round with any item/candy that will fit.
CLICK HERE FOR HOBBY HORSE TEMPLATE
or Go to SHARING♥ Tab Up Above.

Down below are some Not so quick Gifts...HE HE! That's A Sarcastic he he!
The Five Point Stars I mean, the Cookie Cutter Fudge was super fast and Super Yummy!
The stars Take a Little time... cutting and scoring
Lilli and I made a BIG one for our tree this year, I'll get a picture soon...
Here's the template, there is also a Sizzix die, if you can find it, that will make it easier for you,
unfortunately I do not have it.
5 POINT STAR TEMPLATE CLICK HERE
It's not of my design I found it on the web.

Back to the Last Minute grind....Of which I'm not Sweating,
cause the parking god is on my side. Now if she would talk to the checkout god....
Hugs

Friday, December 17, 2010

Sew Happy....


Stampin' UP!® is coming out with a whole suite of sew cute stamps, fabric, paper, and accessories!
A Little sneak peek of "oh SEW Suite", from the, soon to release Occasions Mini.
This cabinet, no longer have it BOO HOO), was For the Inky Angels & Inked Blessings X-mas party.
Found the cabinet at the thrift store filled with Linkin-logs, for only 2.00$ CHA CHING Again!

Here's some Deets....

Painted it here and there with brown and green craft paint, then applied, with sponge brushes, Aileen's Tacky Glue to these spots in one direction and immediately with the top coat color in another direction.
Worked like a dream and cheaper than the actual crackle paint.


Pin cushion section, using some Sweet Stitches fabric and the Sew Suite Stamp set.


Buttons and more section,
and a little clothes line, really can hang some fabric Samples and more from it.


Scissor Section, this is hanging by a wooded piece and a fun button on top.
Stamped the Tape measure from the set for a little accent.
The tape measure clear stamp is very long and must be put diagonally on a block.
When you get this set...of which I know you will. You will see what I am talking about.☺


A miniature cross and cork board.

Some thread and Cross stitch floss to use on your projects.
The Whole cabinet is use-able.
* just a slight note...there is no sewing on this, it is all the
Sweet Stitches fabric, Anywhere glue stick, and a Hot Glue Gun☺
Alicia C. an avid sewer, stole this awesome piece, and it could not have gone to a better home.
I thought about saving and entering it in the 2011 Artisan Awards. But have decided not to enter this time.
I'm terrible at keeping works of art a secret and not sharing.
So I will share away....
Have a Great Weekend

Wednesday, December 15, 2010

Some Quick Deco....Matter of Fact...

This is going to be a quick Post....

Rolled Designer Paper Tree's...
And $ store frame with my Fave DSP and Hot glued Ornaments!

Quick and Simple!
Hugs

Monday, December 6, 2010

I Love Tags....

I Love Tags...
This is a pic taken in the revamped light box and instead of re-doing this post,
I did A Fast Video.  Like I say in the video I'm not a professional Photographer, well.....
I'm certainly not a professional Cinematographer, especially with Flip
he's a good friend though!
Need to know about the tag...you know what to do.
3...2...1
*This Video is now in the Video Tab up top.


Friday, December 3, 2010

Thrifty Word of Advice....

Make sure your intention's of what your buying it for works before you go and alter it!
Meaning...I planned on making "what ever this thing was" a magnetic Advent Calender.
After completely creating all the days and decorating this, whatever this thing is, and proceeding to hot glue the magnets on, I realized they did not stick....UGH!
OK re-think part.....Oh these cute little clothes pins scattered all over my messy work space.
TA DA!
Always another way.

I bought this, whatever it may be, thing a while ago, 
actually 2 of them for 1/2 off the original price, Cha Ching!
I knew these would make awesome advent calenders, didn't know what I was going to do to em, just stewed a bit and just started working...final results a retro piece of art!

Lilli asked why it's not red and green, this is where I go into a convo about "Stepping out of the Box"
Yadda Yadda Yadda and who whats to be normal all the time!
Little does she know it matches our home decor already, blending nicely and normally☺

By the way anyone know what this piece was? 

Have a Great Weekend!♥


Sunday, November 28, 2010

Do you have these?....


Silver Plates and Platters
I did at one time, and probably bought the same ones I donated.
That's OK it all helps for a cause anyways♥
These were only 10.-25. cents at my thrift place. I think I claimed more on my taxes☺
 The plate above actually hangs on the wall from the clock.

Here's the Deets....
Drill a hole in the center 
Make sure you punch/hammer a starter hole so your drill bit does not slide.
Trace plate center on to your paper choice, cut and sand for a more smooth edge.
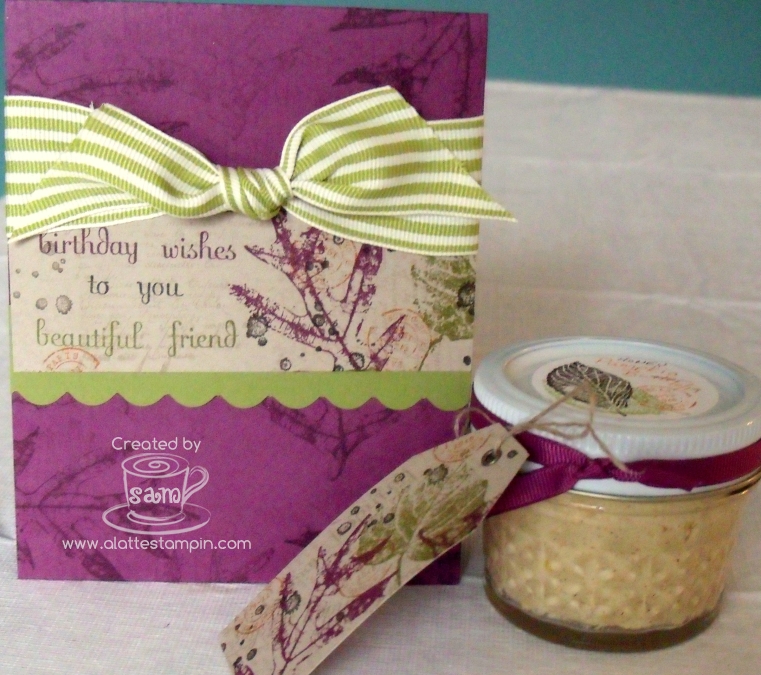
Stamp your image, mine is embossed in black, them colored, with a little sponging and spritzing.
Modge Podge piece down and on top, let dry.
Insert clock with the instruction's from package, I found my clocks at my local craft store for $3.50.....coupon!!!!
Beware to get the right shaft length for your project , there are many from short to long.

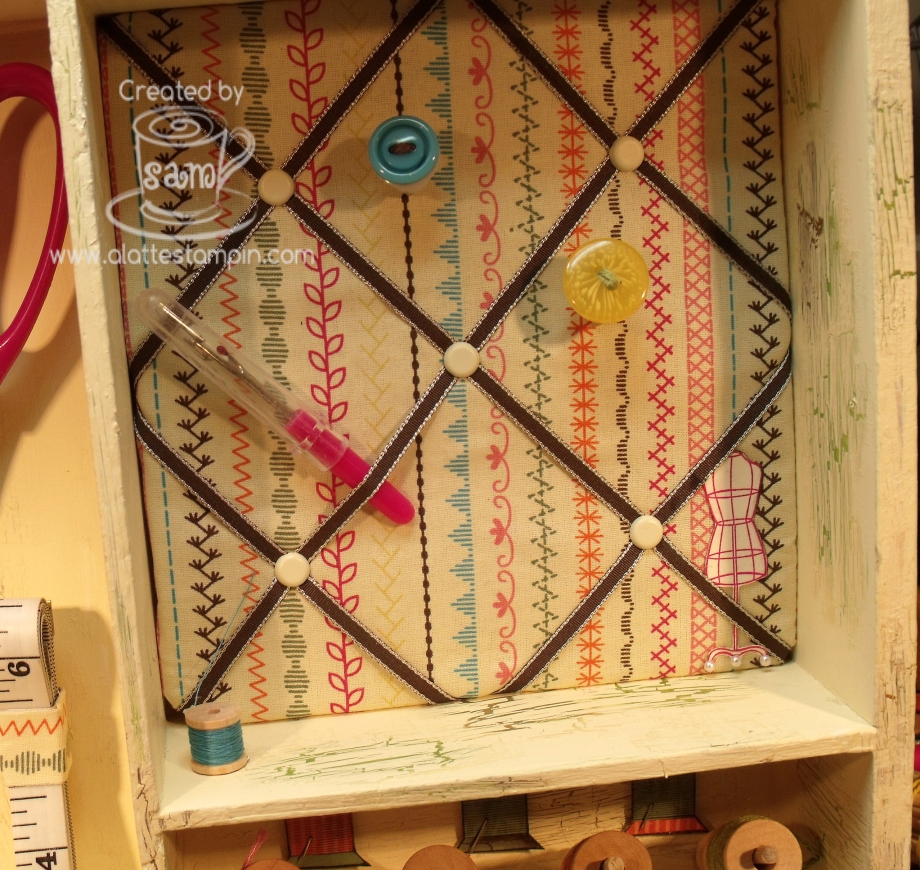
Or just omit the hole and make a nice inspiration piece....Like below.


Fast and easy 
whether you make it  Shabby Chic, like above, or more Modern (I'll show more later) 
the possibilities are endless...
add a pretty bauble or two, stamp on tissue paper for a more opaque look, add more ribbon, 
put the numbers or not and so much more.

Let me see what you do.
Thank You Janis Gurney for the inspiration.
Go check her out. I'm a frequent blog stalker, become one too.

Update about me: I have gone completely Hobby-makes me happy!
I will have "some" classes/camps to offset costs and will still take orders when you need them.
You MUST call or e-mail me for I will no longer have a Business Site.
I will still be here Blogging and Sharing♥, probably as much as I have always done anyways.
It's kind of funny that when I make these decisions, he has new plans by throwing curve balls at me...
lovely ones at that....
I'd like to Welcome my new Downline Christina Brashears, yep you read that right New Downline,
she knows of my decisions and still loves Me!
We both Love the Creative side and I will show you some of her awesome Creativity soon!

My joined venture with my Mom in Scentsy has become a Huge Success!
It makes me so Happy to see my Mom out and about after her past year of no-ups-just-downs,
getting back to family, reconnecting with past friends and making new ones.
My Aunt Jackie, our Office Manager, I Love You, your a big part of all our success.
I promise to give you more accurate order totals from now on...I know she actually reads my blog!
Like to know More about Scentsy...Contact me!

Thursday, November 25, 2010

Happy Thanksgiving!!!!

Not quite a Thanksgiving Card...but it does have Thanks on it, does that count?

May your stuffing be tasty
May your turkey plump,
May your potatoes and gravy
Have nary a lump.
May your yams be delicious
And your pies take the prize,
And may your Thanksgiving dinner
Stay off your thighs!
~Author Unknown

Nothing is more honorable than a grateful heart. 
~Seneca

Gratitude makes sense of our past, brings peace for today, and creates a vision for tomorrow.
~Melody Beattie

And my Fave...

I am Grateful for elastic on this Thankful  day!
~Author Unknown

HAPPY THANKSGIVING!♥

Tuesday, November 23, 2010

No more Cat Naps...


A cheaper way to take my photos and much sturdier... so no more cat boxes. Older post☺
Very first photo up above with no editing, only cropping.
Less time taken to get it right enough to show you the true color of a card and other items...and all for a heck of a lot cheaper than ordering online, or your cardboard made, becoming a cats napping area...twice!
I have come up with a better formation than this so it will actually save more. Too excited to show you!
 *So check back to this post I will edit with that formation (with pics) and accurate supplies!
It's still not done I still have to get backing pieces but...
Here's the scoop: PVC 1/2'' cut at 16''...I'm thinking I might make them 12'' instead.
8 three-ways for the corners
2 -$5 lights at the big orange box store.
2 yards white cotton, check your remnants. Velcro, I sewed mine, there are no sew kinds for fabric.
The best part, it comes apart and stores away nicely, going to make a bag, when time permits.
Need more info Contact me.


Friday, November 12, 2010

Winner, Winner, Chicken Dinner!

 It's Live today So I can finally show my winner.
This Card won in Decembers Stampin' Success, the Stampin' UP! Demo's Monthly Magazine. 
Most of you will never see it, only my Demo Friends, luckily I took a pic before mailing it off.
It was my very first Submit to the Magazine.
I "think" of submitting for all kinds of contest, either time never permits or I'm just a chicken.
Buck.....

This part was actually a mistake but I did a little fix and really liked it.
So when the card is shut there's this curve to this part of the card in the shape of the punch.
Need to know more...Contact Me.
Have a Great Weekend!

Wednesday, November 10, 2010

Real Quick..


It's my day and I'm taking advantage...Mani-Pedi.....Shopping!!!!!
After I  go to the stinkin post office and Bank...well maybe the bank will give me a card and maybe there will be some money in it...why not I'm always giving it to them.☺

This card is using an Envelope sealed shut and Sliced.
Make a card front Glue to sealed flap side of envie. Make an insert.
WA La!
Happy Happy Happy!
Hugs

Friday, November 5, 2010

Honey Pumpkin Birthday Butter

A Couple of weeks ago was Lisa Freeman's Birthday and she got my 
Honey Pumpkin Butter it's so Yummy just ask her and all who celebrated with us.
The pic taken in a quick  "Oh I have to get a picture of this," moment
is in the Man cave, it was rainy, so not as nice as I would like but...
I have remedied that (seems like I keep trying) and I will show you soon and it's for good this time.
Like the Butter receipt? 
Super simple and I know most of you have some kind of cute container to put it in, if not
just eat it right out of the bowl!

Pumpkin Butter
1 stick of Butter
1/2 cup Honey
3 Tablespoons of Pure Pumpkin
1 Teaspoon Pumpkin Spice
Let butter soften in bowl you will mix it in 
add all Ingredient's and Just Beat It!

WOO! 
Wear your white Glove too,  makes it taste better...Not!
You can make several batches at a time, say like 3 sticks of Butter☺, 
just make sure all other ingredient's add up too. 
I also do not add all the honey, with 3 sticks I only added about a half of a bear. I left him some☺

Have a great Weekend! 


Wednesday, November 3, 2010

Pumpkin....Apple....Anyone!


Pumpkin or apple Template FREE in my Sharing Tab up top
Or Click HERE.
There are more templates to come...And samples are Slooowly, Slightly, Started☺
And a little crazy might be added in.


Make sure you share your Creations and let me see!
Hugs

Monday, November 1, 2010

Back....

Just a little time away...OK more than a little.
Just a few...OK more than that, "Life" is a happen-in Hot Stuff (old movie quote) 
It's been Crazy around here!☺
Not much stampin happen-in around here either, I will remedy that though.
So bare with me, as I get back to normalcy, I do have to say, all this craziness has been kind of fun!
I'm sure I will will tell you more in future posts.
This card is a change up from another card by Lisa Johnson, in an older stamp book I found on the clearance rack...remember to check those, surprisingly they do put stamping book on them GASP!
I just used Stampin' UP!® Stamps and paper.
Card cut from Baja using stamp sets Extreme Elements and Vintage Vogue.
Bottom paper is from Bear paper, name escapes me and my catty is packed up.
Sponged with Pear Pizazz.
Sponge black all around and spritz with black also.
Kind of a Grungy look.
Need to know more Contact me.